
 PM Inventory
To access the Inventory module, click the Inventory button on the main menu

The main features of the Inventory system consists of:
- Products – All items that are sold to patients can be entered here. You can track the quantity of units on hand and enter a variety of other data.
- Purchase Orders – This is where you enter items from the product list that you are ordering. It works with the Receiving Entries to track the orders when they come in.
- Reports – Inventory, Items Sold, and Sales Tax.
SETUP
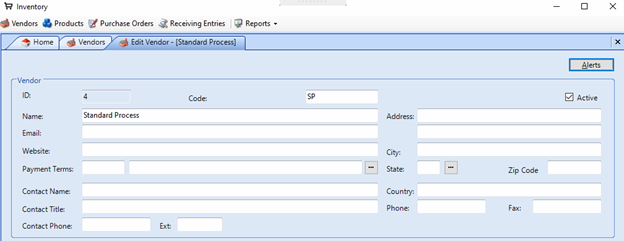
Create a Vendor:
- Click the Vendors menu item at the top left of the Inventory screen, it will now show as a tab below the menu next to Home.

- Click the Add button at the bottom right to add a new Vendor. Here you need to create a Code and Name to be able to save the record.

Add a product:
- Click the Products menu item and then click Add at the bottom right to create a new product record.

- Choose a Vendor
- Click the pick button to the right of the Type field. Here you will also need to add a record and enter in a Code and Description. This is to identify what type of item it is like a supplement or office supply. Highlight the Product Type record and click Select at the bottom right.
- Enter in a Stock No. This can be any kind of number you want to identify the product like the bar code or whatever you use as the QuickCode from the Fee list in PM.
- Enter in the Name of the product.
- Enter in the Description of the product. This can be the quantity or size.
- Click the pick button to the right of Storage Area. Here you will also need to add a record and enter in a Code and Description. This is to identify where the product is stored in your office.
- Set the Units on Hand to how many you currently have in stock.
- Set the Reorder Level to how low you allow the stock to get before ordering more.
- Set the Reorder Amount to how many units you order at a time.
- Set the Purchase Price if you plan on using Purchase Orders to track your shipments. This is the amount you pay the vendor for that item.
- The other fields are optional.
- Click Save.

Link Products to Fee Codes:
- Click the Fees button at the top right. This will show you every fee in the database from every fee schedule.
- Click the Fee Description header to sort them by name so you can see the item you want located in each fee schedule grouped together then check each one off that you want to subtract from the Units on Hand when this item is charges on the billing side. Click Select and then Yes to save the linked fees. Now you can close the product screen.

Purchase Orders
How to create a purchase order:
- Click the Purchase Orders menu item.
- Click Add at the bottom.
- Choose a Vendor.
- Click Add Item on the right. This creates a new line in the Purchase Order Details section.
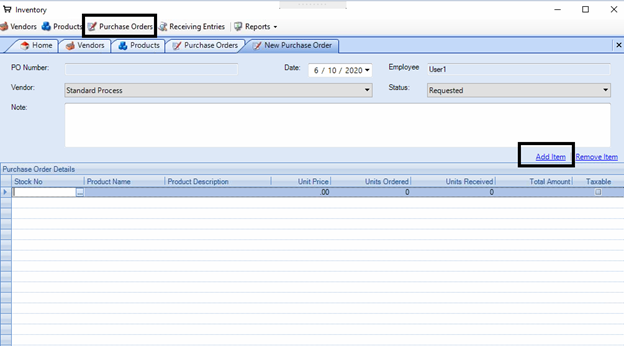
- Click the pick button in the Stock No field to choose the item to order from that vendor’s product list.
- Set the Units Ordered to the correct quantity that is being ordered.
- The Unit Price comes from the Purchase Price in the Product record.
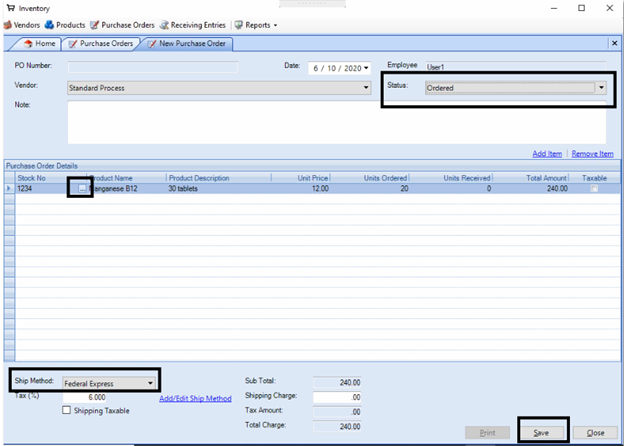
- Choose a shipping method. The Tax % pulls from the value set in Settings/Ledger from the billing side.
- Entering a Shipping Charge in the bottom middle if applicable. Check the Shipping Taxable box at the bottom left if you pay tax on the Shipping Charge.
- Once you add all the items being ordered change the Status at the top right to Ordered.
Receiving Entries
Create a Receiving Entry - when an order is shipped to your office.
- Click Receiving Entries menu item.

- Click Add at the bottom
- Click Select at the top left in the PO Number field. Choose the Purchase Order for this order then OK.
- Set the Units Received to the units received for each item. This example shows a partial order received because 20 were ordered and 10 received.
- Check the Update Units on Hand box at the bottom right. This will update the Units on Hand for each product in the Purchase Order.
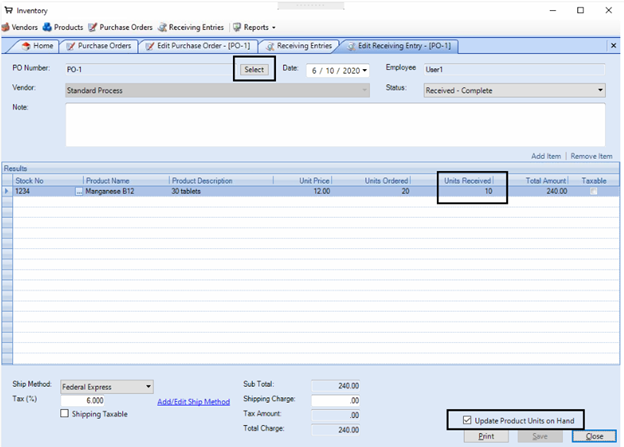
- Click Save
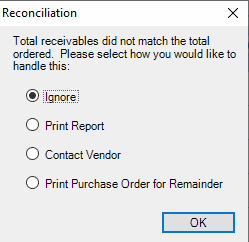
- If a partial order was received, select how to handle it on the next screen.
Reports

Inventory Report
- This report lists all your Inventory items. It prints the Vendor, Product Name, Number on Hand, the Reorder Level, Reorder Amount, Cost, and Total Cost of each item. It also provides a grand total at the bottom.

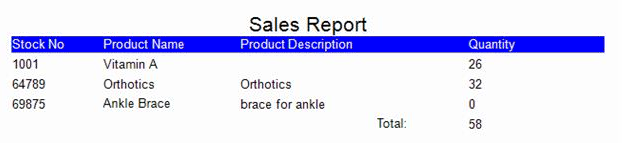
Sales Report
- You can choose all dates or filter on a date range.
- This report lists the Stock Number, Product Name, Product Description, and Quantity. It also provides a grand total of the number of items sold within your time frame.
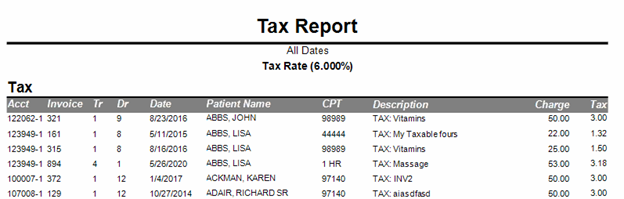
Sales Tax Report – this is a great report for reporting sales tax to the state
- You can choose all dates or filter on a date range.
- This report lists The patient account#, Invoice#, Transaction#, Doctor ID, Date, patient Name, Fee code, Fee description, Charge amount, and Tax amount.
0 Comments